Van Build 3.2: Rear Cargo Door Windows – The Leak, How Not To, & How to Fix...
- Veronica Aragon

- Mar 3, 2021
- 10 min read
Updated: Mar 15, 2021
The 2nd post of the window installation series as promised. I’ve neglected other areas of the blog because some of you have been patiently waiting for this post, so here it is...
The rear cargo door windows. And. . . the dreaded leak AND how we fixed it AND how to avoid it in the first place!

There are three posts in this series in total. We went from easiest to trickiest installation ‘cause that’s what you do when you’re a beginner. So, the posts are in that order as well:
3.3: The Trickiest – Installing Side Windows that Don’t Fit the Factory-Size Cut-Outs
If you want more information on how we decided where to place our windows, how many windows, factors to consider like loss of insulation, type of window, etc., that was all explained in a previous post: https://www.onanimperfectjourney.com/post/van-build-diary-3-measure-twice-execute-once-fitting-windows-into-the-layout
I highly recommend reviewing that post if you’re still deciding on placement. Your layout will determine the size of the windows, too. So, give that post a good look through to help you ponder all the variables!
In this series, we will primarily be going through the installation process, which is different for all three types of windows that we got. We started with the C.R. Lawrence sliding door window because it was the easiest.
We then moved on to the rear cargo door windows because we felt confident enough with the cutting/curing part of it all and decided to add the complexity of gluing on the windows. Little did we know we’d make one crucial mistake that would result in a leak, for which Van Windows Direct has a fantastic fix that worked for us!
So, without any further ado, we’ll jump into the installation process, highlight where we went wrong and how to avoid it, and add on the “fix” at the end, since hopefully you all can now avoid our mistake and will only need to refer to that part after you’ve tested for leaks.
A quick disclaimer that there are some affiliate links- I may receive a small commission (at no cost to you) if you purchase through the links provided. (Learn more here) Thanks for supporting On An Imperfect Journey!
Tools, Equipment & Supplies
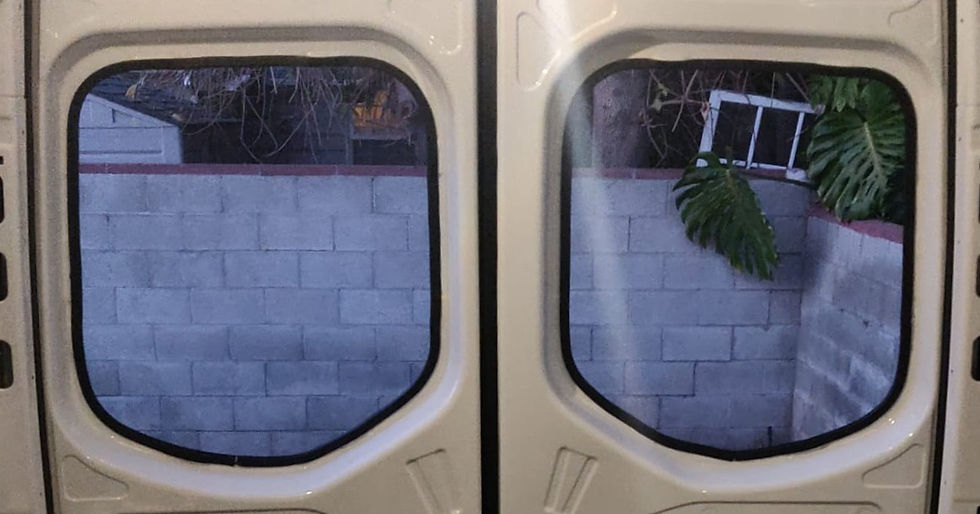
Sprinter Rear Cargo Door Windows (ours are for the 2020 model but make sure you get for your model; check out this post if you want to know why we went with the VWD brand window)
c and plastic cover to collect metal shavings inside and to tape up the jigsaw and outline of your cutout
A Phillips’ screwdriver or pick and hammer
A whiteboard marker or grease pencil
A Jigsaw (we recommend this Black and Decker one) – getting a strong, reliable jigsaw is really important – it can make the difference between cutting a window in 45 min. and cutting it in 20.
Rustoleum and applicator
Drill with a 1/8” bit
Primer & applicator (came with our VWD windows install kit)
Auto Glass Sealant Windshield Urethane Glue (purchase 3 of the 10oz/300ml)
Power Caulk and Adhesive Gun (we strongly recommend electric rather than manual)
Window trim (came with our VWD windows install kit)
Razor blade (to cut the trim)
Auto glass cleaner & paper towels
Tools, Equipment, Supplies for Fixing the Leak
A caulking gun
Installation
IMPORTANT NOTE: We installed both windows at the same time. This means that we did steps 1 thru 4 for Window #1 and then steps 1 thru 4 for Window #2 (while the Rustoleum dried). We tried to do the rest of the steps as concurrently as possible so that we could glue them on as concurrently as possible too for symmetry’s sake. I’ll give more details below.
1) Prepare the Area
You also want to prep the jigsaw. Line the whole metal plate with painter's tape so it doesn't scratch the paint of the vehicle as you're cutting.
With painter’s tape (the wider it is, the easier you can cover all openings) and plastic (we used our large Costco trash bags), tape up all openings and crevices in the van door, nearby walls and cover the van floor to protect from metal shavings.
2) Create an outline and entry-hole for the jigsaw to cut along
From the inside of the van, you can see exactly the outline of your cut. However, if you’re going to use a jigsaw, which I strongly suggest if you aren’t used to cutting metal, then you have to make the cut from the outside. The jigsaw will not make it around the corners without scratching up your van even when covered in painter’s tape (see step 3) (we learned this from experience!).
To precisely mark the cut-line on the outside, take a pick or a long nail (otherwise just grab your Phillip’s), and knock it hard with the hammer, making small dents all along the factory window cut-out. I would mark it up ever ½” to 1” along the straight edges and ¼” along the curved edges to help guide the jigsaw more precisely on those curves.
You don’t need to hit too hard but just make sure you’re creating a dent on the other side.

On the outside of the van, you will now connect the dents (connect-the-dots!) with your whiteboard marker or grease pencil and you now have an outline to cut from!
Also, line the outside of your outline with painter’s tape to doubly protect your van from getting scratched by the jigsaw. Find a comfortable starting point and drill a hole to start your cut from. The hole should be on the inside edge of the cutout.
Cutting on the outside of your outline will mean cutting too wide! While this isn’t such a big deal here because the glass is much bigger than the cutout, you don’t want to cut your frame unnecessarily wide and cutting wider means cutting through two pieces of metal. Plus, you’ll want a clean edge to fit your trim over, which will be visible from the inside and which, therefore, you’d like to have as symmetrical as possible.
3) Cut the Hole
Grab your jigsaw and cut away, following your outline the whole time.
4) Smooth the Edges & Treat for Rust
File the window opening on all sides making sure to leave a smooth surface. Now you’re good to clean up all the metal shavings and remove the plastic and painter’s tape (if you’ve prepped the area for both windows, just make sure that you clean the area around the window opening for window #1, while leaving the plastic and tape in place to cut window #2.
Also, make sure that in the end, you clean all the metal debris. You don’t want it sticking around and causing a rust problem later on.
With the applicator (we used a sponge applicator), apply the Rustoleum to the cut edge and let dry (approx. 1 hour).


5) Install the Trim
The trim is for aesthetic reasons and will only be visible from the inside. Having said that, you’ll want to press the trim into metal frame in a way that the seam is least visible. Since our bed is at the level of the bottom of the window, we placed the seam at the bottom. You’ll want to cut the seam with a small overlap (1/16-1/8”) and then shove it into place. That makes sure that the seam is least visible.
The trim fits very tightly onto the metal frame. If you’re really struggling, you can take pliers and widen the trim a bit so it slides on easier (the inside of the trim is metal and is bendable).
6) Prepare for gluing the window
You will want to make sure that all surfaces are clean. This means that you will want to clean the metal frame and the window with glass cleaner. You don’t want anything interfering with the adhesion, including oils from your fingers. Once you’ve cleaned the part of the window that will adhere to the metal, try not to touch it anymore – pick up the glass from the edges and use the suction cups if/when needed.
7) Apply the Primer
This step will depend on what kind of urethane you’re using. The urethane we used is “primerless to window” – which just means that you only need to prime the metal. Other primers require you to prime the window AND the metal. I would not suggest this for beginners because you have to line up the two places you’re priming.
With a “primerless to window,” you just need to apply the primer to the metal, then apply the urethane onto the primed area, and then your window just goes where it needs to go and you’re not worried about whether or not you properly matched the primer to the correct placement on the window side.
As far as applying the primer to the metal, the applicator that comes with the primer is the perfect width. You don’t need to apply wider than that. Just drench the applicator in the primer (don’t dip it into the bottle but spill the contents of the bottle over the applicator) and press it against the metal, applying it evenly all the way around. Whatever that width is of the painted strip of primer is the width you need.
As far as WHERE to apply the primer, that can be a bit tricky and different depending on your van model. There is very little room on the bottom and top of the window frame area to apply the primer, whereas there is much more room to play with on the sides.
When we touched based with VWD, they said that you don’t need to apply the primer/urethane more than ½” from the trim. This is for two reasons:
If the urethane squeezes/leaks out, it is better that it presses out on the inside of the van where it is less visible. If the urethane leaks out from under the window to the outside, it is very difficult to remove and ruins the aesthetics of the cleanly-mounted window from the outside, where everyone can see it.
The further away from the trim you apply the primer/urethane, the more urethane you have to use (because you’ve created a bigger perimeter).
Now, we checked in with VWD after we had already created one primer line on Window #1. So, we reprimed a smaller perimeter closer to the trim after that chat. So, Window #1 looked a bit like this as far as priming:
The good thing is that you can't see the double primer lines through the window, whew!
As far as our chronology, we primed Window #1 and let it dry for 20 min. In the meantime, we cleaned both windows and prepped the adhesive gun to apply for Window #1. We then applied the primer to Window #2’s metal frame and let it dry while we finished up Window #1.
8) Apply the Urethane
It is very thick and I strongly recommend using an electric adhesive gun like the one we used. We had a manual heavy duty caulking/adhesive gun and it was too difficult to evenly squeeze/spread the urethane on.
Now, applying the urethane is one of the most important steps. So, here are the most important tips for applying it properly:
The urethane cap has a cut out that you need to cut exactly – you cut straight and the down to create a “V.” This creates a triangular bead as you apply the urethane with the “V” facing up.
Never lift off or break the bead. Any lift off or break can be a potential cause for a leak.
Obviously, apply the urethane on the primer!
Start the bead somewhere in the middle of one of the sides and go up and around. This ensures that, even if you run out of urethane in your 10oz/300ml container and have to break the bead, you’ll be able to make it all around the top before than happens. The last place you want to break the bead is on top.
Now, on that last point, be prepared and have three containers of urethane just in case. One for each window and a third in case you run out on either and need to fill in a gap.
Also, once you join the bead, take some kind of putty knife or even a butter knife (it’ll get ruined), and make sure that the joint has no gaps whatsoever.
NOTE: we didn't document this part of the install onward because we were nervous and super focused and simply forgot. So, here is a clip from Van Windows Direct of this part of the install:
9) Adhere the window AND DON’T LIFT OFF AT ALL!!!!!!
Sadly, we don't have a video of this part as mentioned above (I promise, we're upgrading our recording equipment so that we can document every step of the process).
So, this is the step where we made our big mistake. In trying to line up the window properly and not press it too close to the metal, we accidentally lifted the window ever so slightly off and broke the bead. It happened in a split second and I didn’t even register the consequences when we did it. DON’T DO THIS!!!!!
We probably should have just taken the whole window back down, cleared all the urethane off of everything and started over. I’m not sure why we didn’t AND as I look back, that probably would have been a bigger and longer process than the fix so I’m kind of glad we just pressed it on.
IF YOU DON’T LIFT OFF, YOU’LL BE FINE!
You don’t need suction cups but they definitely do make life easier, especially when trying not to get handprints on the inside of the window and if you’re trying to press the window on evenly all around.
Get your window in place and press it on. Give it a few good taps all over without pressing too hard. You don’t want the window flush against the metal. Rather, you just want the window to line up with the exterior frame of the vehicle. The 2020 window really needs to line up exactly with the inside edge of the door, otherwise your exterior edge will touch metal.
Once you’ve micro adjusted the position, grab painter’s tape and tape the window into place so that gravity doesn’t shift it as it dries.
Then repeat steps 8 and 9 for Window #2 (assuming you’ve already applied the primer ahead of time, like we did).
10) Test for Leaks – READ FURTHER FOR HOW WE FIXED OURS
It’s nerve-racking, I know. Just do it. It will feel so much better when it is all said and done.
Even though it will feel horrible when you find a leak – so much work, so much stress – this is your future home and your first mistake/failure is always hard to take.
But you have to do it. Better figure it out now and fix it before you hit the road than blindly believe everything’s great when it’s not!
11) Fixing our Leak
The fix is actually quite simple:
- Remove the trim
- Apply the silicone into the gap between the frame and the window (we did all the way around to create a new solid seal)
- Put the trim back in place
Easy as that! We re-tested the window and the leak was fixed!
3 more windows to go in the next post!
If you’re interested in following along with the build, please hit the subscribe button at the top of the post!


Comments